 Aiming at the problems of geometric error identification and modeling of CNC machine tools of the existing laser interferometer, complex operation process and low modeling efficiency, a new ballbar-based geometric error identification and modeling method of CNC machine tools is proposed. Using the three-plane arc trajectory measurement method and the ballbar to measure the error, the identification model between the ballbar reading and the corresponding geometric errors in each plane of the machine tool was established, the geometric error identification was realized, and the comprehensive error prediction of the machine tool was established. Model. At the same time, a laser interferometer is used to establish a comparison experimental device to measure the actual geometric error of the machine tool. The geometric error data identified by the ballbar and the error measured by the laser interferometer are respectively substituted into the machine tool comprehensive error prediction model for comparison and verification. It can be seen from the comparison results that the difference of the machine tool comprehensive error model established by the two methods is 3.0μm, which can meet the requirements of machine tool error compensation.
The on-machine measurement system of a CNC machine tool is composed of the machine tool body and a trigger probe. The probe generates a trigger signal and triggers the three-dimensional coordinate reading device of the machine tool to perform readings to realize the three-dimensional coordinate measurement of the measured point. If the accuracy of the measurement system is not improved, the measurement is carried out directly by the combination of the machine tool and the probe, which does not meet the requirement that the accuracy of the measurement system must be three times higher than the accuracy of the measured part. Therefore, the error separation method must be used to measure the geometric errors of the machine tool. Establish a high-precision comprehensive error prediction model for measurement error compensation [1]. At present, the geometric error identification methods of CNC machine tools mainly use dual-frequency laser interferometers, ball bars, plane gratings and other equipment [2].
The optical lens group needs to be replaced for every error measured by the laser interferometer, and the optical path is not easy to adjust, the efficiency is low, and the optical components are expensive [3]. The ballbar can separate and identify 21 geometric errors including the roll angle error [4-5] by measuring the conventional three-plane arc trajectory, but there is a problem of identification accuracy.
In recent years, scholars at home and abroad have proposed many methods for identifying spatial errors based on ballbars, mainly for the error identification of machine tool rotary axes [6-9], but the research on linear axis error identification lacks complete experimental results comparison and verification [10]. For the comprehensive error modeling of machine tools, most of them use laser interferometer to measure each individual error, and then use differential method, multi-body system theory and other methods to establish comprehensive error prediction model [11-13], but use ballbar to measure and identify the geometric error There are few studies on the establishment of comprehensive error modeling of machine tools [14].
In order to improve the accuracy of the ballbar-based machine tool geometric error identification and the comprehensive error modeling accuracy, this paper adopts the ballbar’s three-plane arc trajectory method to establish the relationship between the ballbar’s readings and the geometric errors in each plane of the CNC machine tool. Model, identify various geometric error values, and then use the identification data to establish a machine tool comprehensive error prediction model, and carry out comparative verification experiments.
1. Geometric error identification method for ballbar CNC machine tools
1.1 Sources of geometric errors of CNC machine tools
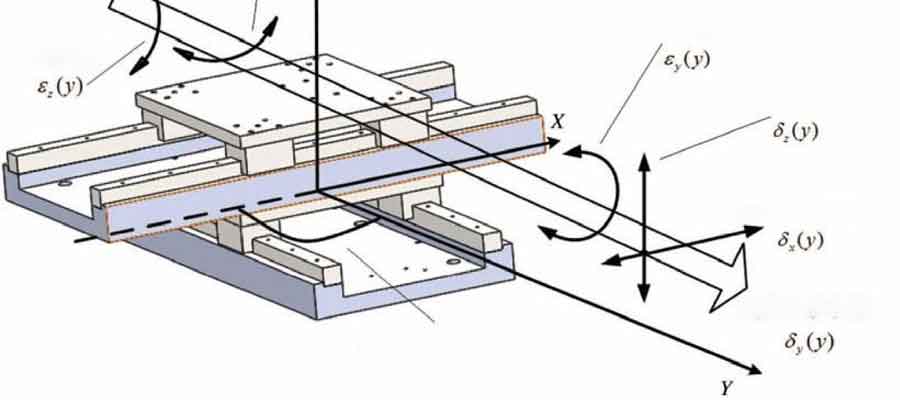
This article takes the XYTZ vertical machining center as the research object. As shown in Figure 1, when the machine tool parts of a three-axis CNC machine tool move along the Y axis, there are a total of 6 geometric errors, and a total of 18 position-related geometric errors are generated by the three axes. There are a total of 21 geometric errors for the 3 verticality errors between the upper 3 vertical axes.

1.2, the working principle of the ballbar
In this paper, the three-plane arc trajectory measurement method and ballbar are used to measure the error [15]. The schematic diagram of the measurement principle of the ballbar is shown in the figure. Make the center coordinates of the precision ball adsorbed on the mounting base of the worktable be O (0, 0, 0), and the center coordinates of the precision ball adsorbed on the spindle mounting base rod is P (x, y, z), when the workbench is theoretically During circular interpolation, the center coordinates of the precision ball adsorbed on the spindle become P′ (x′, y′, z′) due to the geometric error of the machine tool. Let Δx, Δy and Δz be the difference between point P and point P′, respectively. The component of the time error in the X, Y, and Z directions.
Due to the geometric error, the actual length of the ballbar can be expressed as
(R+Δr)2=(x+Δx)2+(y+Δy)2+(z+Δz)2(1)
In the formula: Δx, Δy, Δz are all in the micron level, ignoring the quadratic term, the actual length change of the ballbar can be calculated as follows
Δr=1r (Δx×x+Δy×y+Δz×z) (2)
In the formula: Δr is the reading of the ballbar, that is, the change in the length of the club. This formula is the theoretical basis for the ballbar to measure the geometric errors of CNC machine tools, from which the error separation model of CNC machine tools can be derived.
The three-plane arc trajectory measurement method is carried out on the three orthogonal planes of the CNC machine tool. When the ballbar detects on the XY plane, the machine tool spindle stops moving in the Z direction. Install the ballbar horizontally. The ballbar takes the center of the precision ball supported on the table side support as the center of rotation, and completes the arc interpolation feed with a radius of r according to the CNC command, clockwise and counterclockwise, once each, In the same way, when detecting on the YZ plane and ZX plane, the spindle X and Y directions stop moving. Among them, the 360° (overtravel 45°) arc measurement is performed on the XY plane, and the 220° (overtravel 2°) arc measurement is performed on the ZX plane and YZ plane respectively [16]. At this time, the change in the length of the club Δr is the comprehensive error in the plane, and then substitute the detection data of the ballbar into the identification model between the ballbar reading established by the geometric error identification method and the corresponding geometric errors in each plane of the machine tool to achieve Geometric error identification.
1.3. Geometric error identification method
The 4×4 homogeneous coordinate transformation matrix HTM (Homogeneous Transformation Matrix) is used to identify the geometric error components of CNC machine tools.
The HTM of the Y axis can be written as
Trans(y)=1000010ym00100001(3)
Ignoring higher-order terms, the HTM of the Y-axis geometric error can be written as
E(y)=1-εz(y)εy(y)δx(y)εz(y)1-εx(y)δy(y)-εy(y)εx(y)1δz(y)0001(4)
According to formulas (3) and (4), the HTM of the coordinate system of the machine bed from R to Y axis can be obtained including the geometric errors
RTT=Trans(y)×E(y)=1-εz(y)εy(y)δx(y)εz(y)1-εx(y)δy(y)+ym-εy(y)εx(y ) 1δz(y)0001(5)
Using the same method, you can establish Y-axis and X-axis, X-axis and workpiece W, Z-axis RZT, spindle S and Z-axis, HTM between tool T and spindle S, similarly, tool T is relative to the machine bed The HTM of R can be expressed as follows, and they are used to build the entire kinematics model of the machine tool.
RwT=RYT·YXT·XwT·TW(6)
RTT=RZT·ZST·STT·Tt(7)
Where: the position coordinate vector of the theoretical processing point of the TW workpiece in the workpiece coordinate system, and Tt is the position coordinate vector of the tool tip of the machine tool in the tool coordinate system T.
According to equations (6) and (7), the difference between these two matrices is the relative displacement error matrix between the workpiece and the tool tip, that is, the geometric error matrix of the machine tool is shown in equation (8).
WTT=RTT-RWT(8)
In the process of its solution, the error quadratic term and higher-order terms are discarded to obtain a simplified geometric error model of the CNC machine tool moving along the X, Y, and Z coordinate axes, which are respectively substituted into equation (2), and then a series of simplifications By calculation, an equation with 12 coefficients is obtained. As shown in equation (9), these coefficients are related to the deviation Δr of the ballbar length.
Δr=1rxdxz(zr)2-z·γx, z+2d·dxz(zr2)-Xw+YW2dyx(xr2)+2dxy(yr2)-ZW2dzx(xr2)+eyy(yr)-x-dxx(xr)- dxy(yr)2+ydyz(zr)2-z·γy, z-2d·dyz(zr2)-XW2dxy(yr2)+2dyx(xr2)-YW+ZWexx(xr)+2dzy(yr2)-2x·dxy (Yr2)-dyx(xr)2+x·γx,yy-dyy(yr)+zz+dzz(zr)+d+XWeyy(yr)+2dzx(xr2)-YW2dzy(yr2)+exx(xr)- ZW+x·eyy(yr)-dzx(xr)2-dzy(yr)2(9)
Where: dxx, dyy, dzz, dyx, dzx, dzy, dxy, dxz, dyz, exx, eyy, ezz are unknown numbers; γx, z, γy, z, γx, y are three verticality errors, which are determined by the club The instrument measures; x, y, z, Δr are the theoretical coordinate value and radial error value of each measuring point respectively; r is the measuring radius. Only these coefficients are required to calculate various geometric error values at different positions.
2. Comprehensive error prediction model of CNC machine tools
The comprehensive error model established according to the principle of homogeneous coordinate transformation [17], considering that the three-axis roll angle error value is very small and has a small impact on the overall error of the CNC machine tool on-machine measurement system, so the impact of the roll angle error is ignored. Then the model can be simplified as
Δx=-δx(x)-δx(y)+δx(z)-yεz(x)-zεy(x)-zγx, z+yγx, yΔy=-δy(x)-δy(y)+δy(z )+zεx(y)-zγy, zΔz=-δz(x)-δz(y)+δz(z)(10)
Where: δx(x) is the positioning error of the X axis, δy(x), δz(x) are the straightness errors of the Y and Z directions when the X axis is moving, εz(x), εy(x) are the X axis respectively The yaw angle and pitch angle error; γx, y, γy, z, γx, z are the perpendicularity errors between the X-axis and the Y-axis, between the Y-axis and the Z-axis, and between the X-axis and the Z-axis, respectively.
Establish a comprehensive error prediction model for CNC machine tools according to formula (10)
E(x,y,z)=Δx2+Δy2+Δz2(11)
3. Comparative verification experiment
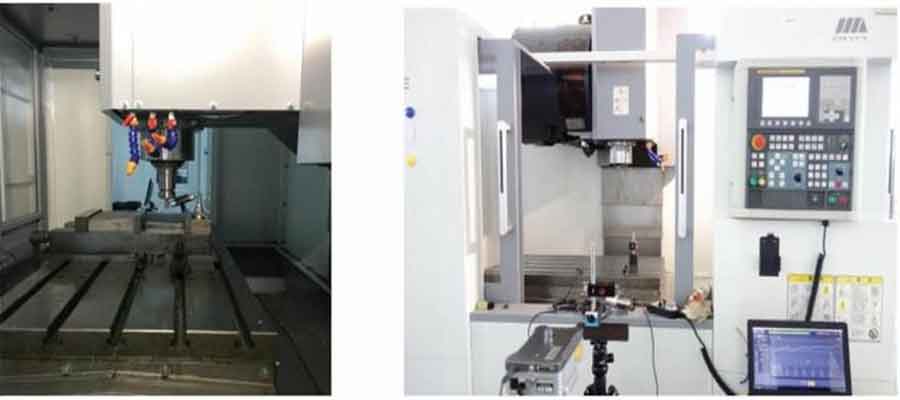
Taking Shenyang Machine Tool VMC850E three-axis vertical machining center as the data collection object, Renishaw’s QW20 ballbar and laser interferometer XL-80 were used to measure the same machine tool. The XYZ three-axis strokes of the machine tool are 800mm, 500mm, and 540mm respectively. The ballbar and laser interferometer used in the experiment have resolutions of 0.1μm and 1nm respectively. The composition of the experimental device is shown in the figure.

3.1. Experimental plan design
The resolution of QW20 ballbar is 0.1μm, and the length of the rod is 100mm, that is, the measuring space is 200mm×200mm×200mm. The three-plane arc trajectory method of the ballbar is used to measure the machine tool in the XY plane, YZ plane, and ZX plane. The combined geometric error. Install the QW20 ballbar on the worktable and measure under the no-load state of the machine tool, so that the spindle of the machine tool will perform interpolation motions with a radius of 100mm in each plane at a speed of 480mm/min, clockwise and counterclockwise. 1 time each, a total of 3 measurements for each plane, and the average value is used as the final value detected by the ballbar to reduce random errors.
Take each single geometric error of the machine tool as an example for model verification. The laser interferometer is used to detect each single error at the same detection position of the ballbar. The data is collected once at an interval of 5mm, and each measurement point is measured three times in one direction. Figure 4(b) shows the on-site inspection diagram of the laser interferometer.
3.2. Geometric error identification and modeling effect verification
In order to verify the correctness of the above geometric error identification results, taking the X-axis positioning error of the machine tool and the X-axis Z-direction straightness error as examples, the actual geometric error of the machine tool will be measured using the geometric error data identified by the ballbar and the laser interferometer For comparison, the two curves in the figure represent the error value calculated by the identification result of this method, and the two sets of discrete points represent the average value of the laser interferometer measurement value. The laser interferometer measures the geometric error of each linear axis ball screw, and the measurement accuracy is high. Due to the defects of the machine tool, the X positioning error measured by the laser interferometer is not continuous, and there are large jumps and drops, while the ballbar recognizes The method cannot predict the defects of the machine tool itself, and it shows a smooth curve. Therefore, the results obtained by the laser interferometer in the figure fluctuate more than the results obtained by the ballbar identification method.
The geometric error value identified by the ballbar is basically the same as the corresponding geometric error value detected by the laser interferometer. Except for the gross error, the deviation between the two is below 2.7μm, and the average deviation is only 1.5μm. This verifies the correctness of the geometric error identification of the CNC machine tool.
In order to further verify the effect of the geometric error identification of the CNC machine tool, the geometric error data identified by the ballbar and the error measured by the laser interferometer were substituted into the comprehensive error prediction model of the machine tool for comparison and verification. Substituting the two data into equation (11) respectively to obtain the comprehensive error prediction value E (x, y, z) of the respective CNC machine tools. For the convenience of observation, take the space coordinates of the point on the diagonal of the measuring space range of 200mm×200mm×200mm (X, y, z) prediction data, where x=y=z=i, 0≤i≤200, and at the same time, exclude the part of the data except the gross error caused by the defects of the machine tool on the diagonal, and the prediction error The comparison of the results is shown in Figure 6.
The change trend of the two prediction results is basically the same, the deviation between the two is below 3.0μm, and the average deviation is only 1.5μm, which verifies the correctness of the geometric error identification and modeling method of the CNC machine tool.
4 Conclusion
- (1) For the numerical control machine tool to use the homogeneous coordinate transformation matrix to analyze the position-related geometric error model, the identification equation set between the error coefficient to be identified and the radial error value measured by the ballbar is established. The geometric error identification and modeling of CNC machine tools based on ballbar is carried out.
- (2) The geometric errors identified by the ballbar are substituted into the comprehensive error prediction model established, and compared with the results of the comprehensive error modeling of the laser interferometer. The results show that the geometric error identification and modeling method of the CNC machine tool has a high Accuracy, the maximum identification error is 3.0μm, and the cost is low, time-consuming, and easy to operate.
Link to this article: Construction Of Geometric Error Identification And Modeling Methods For CNC Machine Tools Based On The Ballbar Working Principle
Reprint Statement: If there are no special instructions, all articles on this site are original. Please indicate the source for reprinting:https://www.cncmachiningptj.com/,thanks!
 PTJ® provides a full range of Custom Precision cnc machining china services.ISO 9001:2015 &AS-9100 certified. 3, 4 and 5-axis rapid precision CNC machining services including milling, sheet metal to customer specifications,Capable of metal & plastic machined parts with +/-0.005 mm tolerance.Secondary services include CNC and conventional grinding, laser cutting,drilling,die casting,sheet metal and stamping.Providing prototypes, full production runs, technical support and full inspection.Serves the automotive, aerospace, mold&fixture,led lighting,medical,bicycle, and consumer electronics industries. On-time delivery.Tell us a little about your project’s budget and expected delivery time. We will strategize with you to provide the most cost-effective services to help you reach your target,Welcome to Contact us ( [email protected] ) directly for your new project.
Link to this article:Construction Of Geometric Error Identification And Modeling Methods For CNC Machine Tools Based On The Ballbar Working Principle
Reprint Statement: If there are no special instructions, all articles on this site are original. Please indicate the source for reprinting.:ODM Wiki,thanks!^^